Wednesday, October 28, 2020

How to Repair a Garden Hose


Picture

​Repairing a hose is easy and inexpensive and you can do it at home in just a few minutes. A new hose can cost upwards of $90! Almost any leak can be fixed for no more than $4 with a hose repair kit.

Complete How-To Video
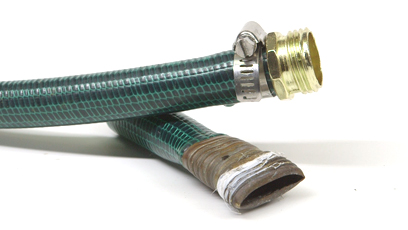

Hose Repair Kits

Picture

Hose Repair Kits:  Come in two different types, metal and plastic. Obviously the metal will last longer and cost more, this is recommended for horses that cost $30 or more.  For anything less then $30 typically a plastic hose end for about $2 will suffice.

Picture

First: Turn on the hose and Identify the problem area, mark it with a permanent marker. Cap the end of the hose before you turn it on because it will build up water pressure in the hose and show leaks that otherwise you might not be able to spot, such as tiny pin-holes or areas that are weak, especially if the hose likes to kink in a particular spot.

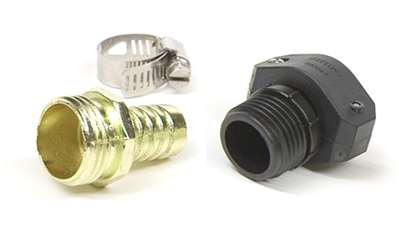
Identify the connection you need:


Female End: This is the end that connects to the facet,  will pivot freely. If there is a leak here it’s more likely that a hose washer is bad then the end needing to be replaced.  If that's the case then simply use a flat head screwdriver to take out the old washer and put in the new one. click here


Male End: The male end is the end that the water comes out of, you can attach a watering device to it like a hand sprayer or watering wand.  Here's a link to the metal male connection we used in this project click here

Inline Connector: This is for damage in the middle of the hose.  This damage can be a very simple hole or quite extensive like a dog making a chew toy of it.  Make sure to cut at least 3 inches on each side past the visible damage.  Here's a link to the inline connection that we used in this project click here

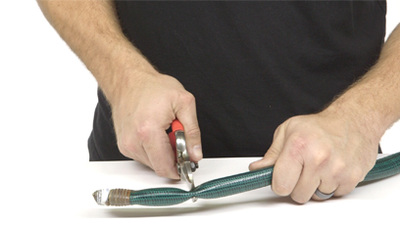
Once the problem area has been identified and marked cut the hose either using a pair of hand pruners or a sharp knife. Try to make the cut as straight as possible to ensure the best connection

Picture

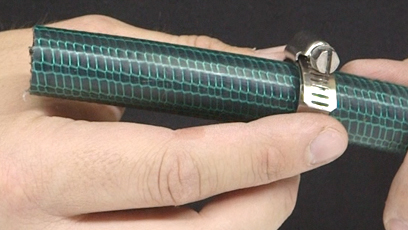
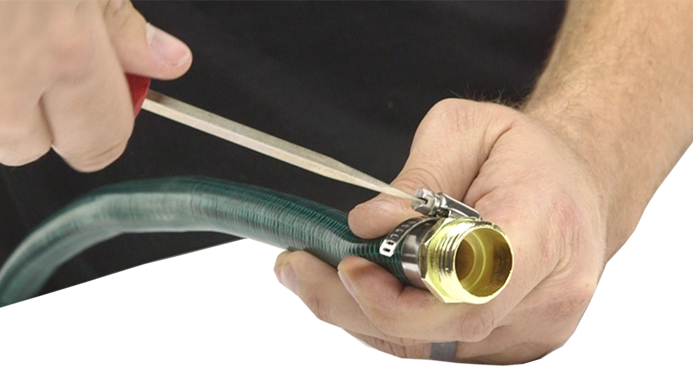
If your hose repair kit comes with a hose clamp slide that on first, if you forget it now you won’t be able to put it on later.  Some hose repair kits come with a clamp built in.

Picture

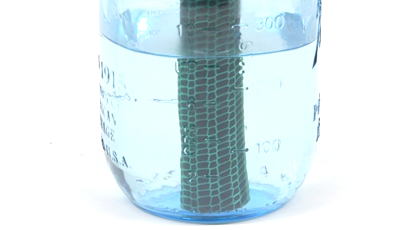
Soak the first 2 inches of the hose end in boiling hot water for :20 seconds.  The heat from the water will loosen the rubber making it much easier to slip in the repair end. As the hose cools it will re-tighten around the repair giving a stronger connection.

Picture

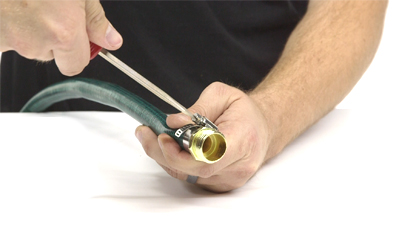
Now tighten your hose clamp, test your hose and you're done! ​

Picture


Monday, October 26, 2020

How to Pot a Plant


This method for potting a plant is the best for almost all plants in any size pot.


Watch the how-to video here!


What you need:


You only need 4 things to get this done; A pot, saucer, rock, and potting soil.  The saucer is important because it will prevent water from getting on the floor, even if your pot is outdoors this will help conserve water and keep it from getting into places it shouldn’t.


Start with your container:

Make sure you buy a pot with a hole in the bottom.  The hole will allow excess water through so that it doesn't sit in the pot and rot out your roots.  If your pot doesn't have holes, we recommend you drill or poke a hole in it, when you are drilling a hole in your pot it is very important that you are using the correct drill bit.  We recommend a mason bit and that it be very sharp, preferably as close to new as possible as you can crack terra cotta, and clay pots easily, let the drill do the cutting you don’t want to be pushing on it and applying too much pressure.  


Tip: Some Nurseries and garden centers will drill drainage holes for you if you are nervous.


Use a rock that's slightly larger than the hole. The rock will prevent soil from washing out through the hole but it won't seal it completely, which will still allow for proper drainage. For pots with multiple holes in the bottom, you can use a piece of window screen to cover the whole bottom of the pot, or you can use a couple layers of rocks, even a shade cloth or weed fabric will work.  You want something durable that still allows water to pass through it.


It's important to use a well draining potting soil.  Potting soil is typically lighter weight, and has water retaining capabilities which is important when planting in a pot.  Don't use soil from your garden outside because you don't want to introduce any potential bacteria, insects or diseases into your pot.  Here's the soil we used Kelloggs Patio Mix 


Because Pots are lifted out of the ground that makes the roots exposed to more air and sun then they would typically be if they were simply planted in the ground.  This puts a premium importance on moisture levels and water retention for our potted plants.


Start by filling the pot about half way up and lightly pat it down, this compacts the soil which minimizes settling and also eliminates potential air pockets that may have formed.


Use the small pot to measure how much soil to put in the pot.  The top of the soil line in the small pot should be two inches below the rim of the new pot. The soil line is the natural point in which a plant grows out of the ground.  We don’t want soil to be above that point because the water that is retained in the soil may start rotting the plant stem.  We leave 2 inches because it will prevent water from flowing over when watering the plant.


Grab the base of the flower and squeeze all sides of the plastic pot to release the root ball.  The smaller the plant, the more gentle you need to be.  Please don’t throw away your plastic pot. Most nursery or garden centers will gladly recycle them for you, some will even give you a credit for ones you bring back.


When you see the roots like this, it means the plant is becoming root bound.  Root bound is when the roots grow into the shape of the pot and entangle within each other. When this happens, the plant growth can become stunted and will not grow to its full potential.  In extreme cases, the plant could die.  This is why it's important to pot up your plants.


Place the plant in the pot and finish filling it up with soil, again, leaving 2 inches of space below the rim.


Give it a drink of water and you're done!   


TIP:  A good way to tell if you are watering a newly planted pot enough for the first time, you want to water a little bit, then let it settle, then water a little bit more, and let it settle and keep going until you see water coming out the bottom of the pot.  This ensures that all of the soil in the container is moist.